Setting Up a Name Server and Hosting Web Sites with Windows Server 2003

- Sep 2, 2005
Page 1 of 4 Next >
Like this article? We recommend


Like this article? We recommend
Learn the trade secrets of becoming your own full-fledged Web hosting service. Jesse Smith shows the steps in setting up a name server and hosting Web sites with Windows Server 2003.
A lot of services allow you to manage your own domain name system (DNS) records for the domains you register. Almost any domain registrar has a web-based software console that you can use to manage these records. However, these services aren't free. Windows Server 2003 can provide the same services for no cost whatsoever. Using Windows Server 2003 to manage your name server is even more beneficial if you host multiple web sites; you gain more control over the process—and the information stored about your servers—and you don't need to go through a third party.
You'll gain the biggest advantage from hosting multiple web sites using Internet Information Services (IIS), with each site having the same IP address. This process, called multi-homing, only works if you have your own DNS server in the same domain (or domain forest) as the IIS web server. Why bother? Because multi-homing web sites reduces hardware costs; no extra network cards are needed for each new site.
If multi-homing is so great, when wouldn't you want to use it? The only time multi-homing won't work is when you have a web site that will use SSL. The reason is that SSL uses a separate port, and can only be used with one IP number or network card per site.
In this article, I'll show you how to set up your Windows Server 2003 as a name server, using IIS to multi-home web sites.
Setting Up DNS
If your server is not set up as a domain controller, use the Active Directory (AD) Installation Wizard to install Active Directory on your server and set up a domain for your network. This domain is important because other name servers across the Internet will use this domain name to refer to your name servers (I'll discuss name servers later). If your server is a member of a domain but not the domain controller for the network, you still need to install DNS if this machine will act as a name server.
For this article, I'll assume that your server is either a domain controller or part of a Windows domain but that you don't have DNS installed on the server. To find out whether you have DNS set up on your machine, bring up the Administrative Tools menu and see whether DNS is listed as an item. If not, open the Windows Control Panel, open the Add or Remove Programs applet, and choose Add or Remove Windows Components. In the dialog box, select Networking Services, choose DNS, and click Next to copy the necessary files from your Windows Server 2003 CD. To verify that DNS is set up and running on your system, go to back to Administrative Tools; DNS should now be in the list of tools.
Select DNS to bring up the DNS management console snap-in, and you should get a screen similar toFigure 1.
Figure 1 DNS management console.
When the DNS server was installed, it automatically created a zone called_msdcs.yourdomainname.com with the appropriate resource records. Unfamiliar with zones? You'll learn a more about them later in this article.
The important thing to know about this type of zone is that it contains the resource record information for making your DNS server work using the server's fully qualified domain name. The domain in my example is farside.ifusionsoft.com. The hostname of this DNS server happens to beFarside, so the fully qualified domain name becomes farside.farside.ifusionsoft.com. (It's a little redundant, but that's how I set it up.) In your situation, it may very well be in this form:
hostname.yourdomainname.com
Many places use NS1 for the hostname of their primary DNS server and NS2 for the secondary server. The msdcs zone is a new type of AD zone that came out with Windows Server 2003 DNS. You won't have to use it to have DNS resolve web sites; a forward lookup zone does that work (more about this zone later).
The domain name that your DNS server uses (in my example, ifusionsoft.com) must be registered with a domain registrant such as Network Solutions or NameSecure. This is an important step allows other name servers on the Internet to point to and "see" your name server. Your domain registrant allows you to forward this domain to an IP address; be sure to forward to your DNS server's main IP address (or an IP address on which the DNS server is listening). It will take up to 96 hours to propagate this information to other name servers; then your name server will be able to resolve web sites that you set up to use the name server.
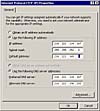
The next task—often missed by administrators when first setting up a DNS server—is to make the DNS server its own DNS client. For each of the network cards in your server, you'll need to bring up the TCP/IP property sheet. In the Control Panel, select the Network Connections folder and right-click the connection to bring up that connection's main property sheets. Choose Internet Protocol to display a screen similar to the one in Figure 2.
Figure 2 Viewing TCP/IP properties.
In Figure 2, notice that the preferred DNS server's IP address is the same as the IP address for this network card (or the main network card that this DNS server listens on). By using this setup, we force the server to use its own DNS. For any needed domain name resolution, it will now look to itself to map IP numbers to domain names. If you're setting up another server as a DNS server, you can specify it as the alternate DNS server, or you can specify any known DNS server as the secondary server, or you can leave this field empty because an alternate DNS server is not required
Understanding and Using DNS for Web Sites
Windows Server 2003 moved from the NetBIOS naming convention for naming machines in the domain to the dot notation that is also the DNS naming convention (for example, jerry.autosrus.com). Therefore, DNS for a Windows Server 2003 domain can be used not only for web sites, but also for the domain itself—locating objects in the domain such as other machines, printers, users, or just about any object using the dot name reference.
Active Directory is the backbone of DNS. Any time you set up a new machine on the domain, it registers itself in AD as an object, and DNS automatically gets this information from AD. All these details are somewhat beyond the scope of this article, but you need to understand that you can create AD domains for web sites (although there isn't much use for this technique unless you're using objects and domain-based logins and permissions).
While you can create different types of zones with DNS, we're really concerned with just one type of zone for Internet-based domains: the forward lookup zone. This folder contains all the hostname-to-IP address mappings. For our purposes, the hostname is the domain name that you want to add for resolution by your name server. Once you create a forward lookup zone for a domain, you can add resource records to this zone, such as for an email service. You can even create different types of forward lookup zones; for example, we'll create a standard primary forward lookup zone for all domains we want our DNS server to manage. We'll get to that in a minute, but first we must register the domain with a domain registrant.
Registering a Domain and Using Your Name Servers
Now that you have a domain that you want your name server to resolve and manage, you need to register this domain with a domain registrant such as NameSecure or Network Solutions. By default, the registrant will use their name servers as the name servers for resolving and managing this new domain. This setup doesn't do you much good, however, so you must change the setup to use your own name servers. The registrant will have a tool for this purpose. You'll need to change at least the primary name server to your name server's fully qualified domain name. Let's say I registered a new domain called mydomain.com with NameSecure. NameSecure automatically defaults their name servers (ns1.namesecure.com and ns2.namesecure.com) as the name servers for this domain. To change this arrangement, I use the Modify Name Servers form and add my name server,farside.farside.ifusionsoft.com, as the primary name server, replacingns1.namesecure.com. After I make this change, my name server will have control over this domain in 96 hours or less.
Creating the Forward Lookup Zone and Resource Records
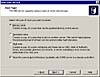
Now we're ready to create a forward lookup zone for the domain on the name server. Right-click the Forward Lookup Zones folder in the left-hand pane of the DNS management console (refer to Figure 1) and select the New Zone option to display the first screen of the New Zone Wizard (see Figure 3).
Figure 3 The New Zone Wizard.
The wizard lists the various major zone types. Leave Primary Zone selected and click Next. The next screen asks how you want your zone replicated. The default option is to have the zone replicated to all other domain controllers in the domain. The other options deal more with local area networks and wide area networks for the domain or domain forest; we're not concerned with either of those options. Click Next to accept the default setting.
Now you need to name the zone file. Use the name of your domain name (yourdomain.com). It's also a good idea to put www in front of the domain; you'll see how important this convention is with IIS when using host header names. (I'll get to that shortly.) You can also create another zone without wwwat the beginning so users can access the site without using www before the domain when accessing the zone over the Internet.
The final screen of the wizard asks whether you want this zone to use dynamic updates for updating resource records automatically if AD changes. You can leave this option selected; it really has nothing to do with Internet domain names. Alternatively, you can choose to update resource records manually.
The zone for this domain has now been created and listed in the left pane of the DNS management console. In the right pane, two resource records have already been created:
- The NS (Name Server) record tells DNS what name server this zone will use.
- The SOA (Start of Authority) has a serial number for the zone and some refresh intervals settings.
You can view the property sheets for either record by double-clicking the record.
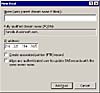
We need to add a Host (A) record. Right-click anywhere in the white space of the right pane, where the zone's resource files are listed, and select New Host (A) from the context menu to display the New Host dialog box (see Figure
4).
Figure 4 Creating a Host (A) record.
Leave the Name field blank. We're going to use the parent domain (the domain of our name server) as this domain's name server. It's already specified in the zone's NS record. Specify the IP address to which this domain will resolve. If you're doing e-Commerce web hosting, you'll likely have several network cards (each with its own unique IP address) on your web server for handling domains. This is because each domain using Secure Sockets Layer (SSL) needs its own IP address. If you're not hosting any web sites with SSL, you only need one IP to handle them all; as I mentioned earlier, this is called multi-homing.
Click the Add Host button and then the Done button, and your new resource record appears in the resource record list in the right pane. This record simply converts the domain name to the associated IP address that you assign to it. This IP address can be anywhere on your network that your DNS server is able to resolve.
This is all we need to do to get the domain name working with DNS. We could add other records for services such as mail, but such tasks are beyond the scope of this article.
Now that the domain is ready and working with DNS, it's time to get IIS to respond to it.
Multi-Homing Web Sites with IIS
Here are the steps that we've covered so far:
- Install DNS.
- Make the DNS server become its own DNS client.
- Register the domain with a domain registrant.
- Register the domain host and the DNS server.
- Create a forward standard primary lookup zone for this domain.
- Create the Host (A) record for this domain.
Now we wrap up by getting IIS to acknowledge all this stuff. IIS supports multi-homing by mapping host header names to domain names. All we have to do is create a host header name that maps to the IP address to which our DNS server resolves the domain. Open the IIS management snap-in on your web server (which may be your DNS server) by selecting Internet Information Services (IIS) Manager from the Administrative Tools menu. Expand the main node in the left pane and then expand the Web Sites folder (see Figure 5).
Figure 5 IIS management console.
Let's continue with my example. I want to create a web site called mydomain.com. To create a new domain in IIS, right-click the Web Sites folder in the left pane, select New Web Site, and follow the steps in the New Web Site Creation Wizard. The second screen of the wizard asks for a host header name. Enter the domain name (in this example, http://www.mydomain.com) in the Host Header for This Web Site field. This instruction tells IIS that any HTTP request with the domain name http://www.mydomain.com is to use the IP address assigned to the site and associate the files in the home directory specified for this domain as the files for this web site.
What if we have another web site, say http://www.mydomain2.com, or even another, http://www.mydomain3.com, tied to the same IP address? Each of these sites would have different home directories and would work fine as separate sites when accessed over the Internet. Your web server gets the domain name from the browser (via the HTTP Request header, part of the HTTP 1.1 and above protocol), and then asks DNS to resolve it to the IP address. DNS routes the request back to the web server on that IP address; IIS takes the request header information and finds the corresponding host header name. Once the host header name is found, IIS knows what home directory or files to associate with the web site.
You can add more than one host header name to a web site; for example, adding mydomain.comalong with http://www.mydomain.com. This strategy ensures that users using either type of address are able to get to the site.
Conclusion
In this article, you learned how to set up your own name server. Multi-homing your web sites can reduce hardware costs and offer services for domains that you would normally have to pay for through a domain registrant or DNS management service.
Another helpful feature is adding resource records for POP3 mail service. I encourage you to explore this possibility; having your own name servers is a convenient and cost-effective solution to hosting many web sites.